Introduction
So this is our second time around making this brew. We took a bottle of the first batch to a friend’s house-warming party last weekend, and it was wonderful. I also happened to take a bottle of a commercial made mead with me, as a booze filler, and the quality difference was astounding. I would recommend mead making to anybody who has tried a commercial mead and thought it was good, because it only gets better from there.
So first batch, which was bottled on the 07/07/23 was pretty much ready to drink as soon as it was bottled, which is unusual for brewed beverages, especially mead. The old school thought pattern is to age a bottle of mead for at least 3 months before drinking it, but often much longer. The newer generations of mead makers are more than happy to drink a mead as long as it tastes good, and that’s why we make things right? To enjoy them. Being so rigid as to not drink a mead for a specific amount of time won’t do the mead any harm, age heals all brews, but I’m all for shortening the amount of time it takes from brewing to drinking.
What’s New?
So for this second batch, we’ve upped the proportions. In our first couple of brews, we were pretty much just sticking to recipes of CitySteadingBrews, but now that we understand the process and the thinking behind making recipes, we’ve started to take some creative liberties with the recipes.
Pretty much every mead brew made by CitySteadingBrews is made with a batch size of 1 gallon (3.785 litres), which is easy for Americans. There are plenty of products that come in 1 gallon glass bottles, which make perfect fermentation vessels, but in Australia and the rest of the world, we use the Metric system. Our local brewing supplies store, Grain And Grape, doesn’t offer 1 gallon fermentation vessels but does sell a 5L demijohn. That makes 1 gallon brews a little small, leaving more headroom than I’m comfortable with and just wastes space that could be used for more mead! That’s all just a long winded explanation as to why our batch sizes going forward will be 4.5l, leaving 500ml for headroom in the demijohn incase of super vigorous fermentations, and maximising the finished product.
Going on with the 19% increase in batch size from 3.785L up to 4.5L, we have also proportionally increased some of our ingredients. We increased the dosage of Fermaid-O, raisins, dried orange peel and and added an additional whole all spice berry. The full recipe can be found down below.
Tools
Some really useful tools that we now use in our recipe making process are The Mead Calculator, by gotmead.com, which is a very useful tool for figuring out projected gravity for a brew or required fermentables in a given batch size (it’s way more than just that), and a Honey to ml Conversion by coolconversion.com, which can convert honey by weight to a volumetric measurement. This is super useful for figuring out how much water to put into a brew to get a desired batch size.


Recipe
4.5L batch size
- 2.0kg Australian Pure Honey, Orange Blossom with Yellow Box (1390ml)
- 250ml black tea (10 minute steep)
- 50 ml water with 3.5g Fermaid-O
- 2810ml spring water
- 68g raisins, chopped
- 1 full cinnamon stick
- 2 whole cloves
- 9 whole “allspice” berries
- 6g dried orange peel
- 1 packet Lalvin 71B Yeast
Aim for starting gravity 1.136
Equipment for Brewing
These are all necessary in my opinion:
- Sanitisation Fluid of choice (I use Saniclean by Five Star)
- A bucket or tub to sanitise everything in
- Fermentation Vessel (preferably glass, and I recommend having a spare)
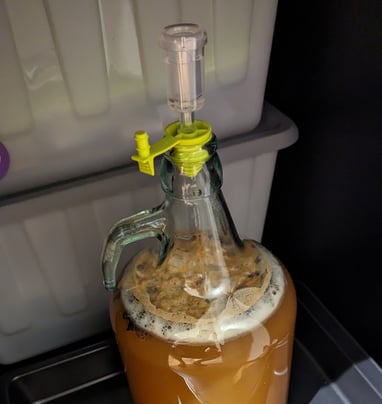
- A Bung fit to the neck of the fermentation vessel (I use a one-size-fits-all taperd bung, seen in the images of my fermenter)
- Airlock of choice
- Hydrometer and Measuring Tube (these are used together, so I will put them together)
- A turkey baster to siphon off a sample for gravity testing
- A large funnel
- A separate funnel for specifically the yeast (the funnels are only necessary in a narrow mouth fermenter)
Equipment for Racking/Bottling
These are all necessary in my opinion:
- An auto siphon (it will make life so much easier)
- Food grade hose that works with your siphon
- A bottling wand (these are magic. Bottling without one is a nightmare)
Method
I feel like now is that time to stress the importance of sanitisation. Every tool that is used in the making, moving, storing or bottling/kegging/canning of mead should be sanitised. If it touches the mead or must (name for mead before it starts fermenting) at any point, it should be sanitised. That means everything you see in the two lists above (and anything else you plan on using) should spend the required contact time (specified on the bottle of sanitiser) FULLY SUBMERGED in an adequately diluted concentration (specified on the bottle of sanitiser). The risk of infection is just not worth time savings of not sanitising. 15 minutes spent up front will save you a month of waiting to see if a mead is drinkable only to find out it has an infection.
The order of operations is pretty important for ease of making. Honey is a very viscous fluid and loves to stick to the inside surfaces of a funnel, so making sure to have your hot tea ready to wash down the honey that has stuck to the inside is very handy.
Step 1 – Preparation
If you’re brewing in the kitchen or on the dining room table, I recommend laying down a towel, so you can make a mess and the clean up with be a little easier.
Sanitise everything. If you think it might need sanitising, do it! If you think it doesn’t need sanitising, you should probably sanitise it! Don’t be afraid to stick your hands in the sanitiser, because they need to be sanitised too! The towel is a great place to dry those hands between dunks in sanitiser. Do not fear the foam. It goes away quickly. Also don’t worry too much about sanitsation fluid hanging around in your fermentation vessel. Try to get as much out as you can but a few drops won’t hurt your brew.
I recommend, ahead of time, chopping up the raisins. It might take 5 miuntes, but getting it out of the way will ease some time pressure. Raisins are just dried grapes, so if they get wet, they’ll inflate back to grapes. Cutting them up lets the yeast get to all the goodness in the flesh of the raisins and the raisins will impart some nice body on the mead.
I also recommend filling the sink of another tub with some warm water, up to about 45 degrees C, and put your honey in the tub for 15 minutes before use. It will hopefully make the honey a little less viscous and easier to manage.
You should also prepare the Fermaid-O (or nutrient of choice) now, if you are using a nutrient in the initial brew.
After all the above is done, boil the kettle and get 1 tea bag of black tea steeping. I recommend setting a timer for the 10 minute steep. Try to time the steep so that it’s happening as you are following [Step 2], so the tea is as hot as possible for washing the honey down the funnel.
Step 2 – Dry Ingredients – Not The Cinnamon or Yeast
Now is a great time to get the raisins, dried orange peel, whole allspice berries and cloves into the fermenter. Nothing fancy, just get them into the fermenter. We do not want to add the cinnamon or yeast at this stage because the cinnamon is too delicate for vigorous shaking and will break up. I try not to stress the yeast as they’re coming out of hibernation, so I will add them at a later stage too.
Step 3 – Wet Ingredients
Getting the wet ingredients in the fermenter next is the best plan of action, because they’ll need to be shaken together to make sure they’ve thoroughly mixed together. The order I recommend is:
- Honey – Get all your honey into your fermentation vessel, it’s the most important single ingredient
- Tea – The hot tea that has been steeping for 10 minutes can be used to wash down the honey that has stuck on your funnel for wet ingredients
- 1/2 the measured water – It’s important that you don’t put all the water in. You might need the rest to wash down the dry ingredients that get stuck in the neck of the fermentation vessel. Try and get any of the last remnants of honey out of the funnel whilst you’re at it. It also makes shaking easier, not having a full fermenter.
Step 4 – Shake The Bejeezus Out Of It
No joke, stick the bung in the fermentation vessel, pick the vessel up, keep a hand on the bung to keep it in the neck of the fermentation vessel, and the liquid inside, and go to town. Shake the bejeezus out of it. At this stage in the brewing, we need to introduce oxygen into the must so the yeast can create a large colony. The yeast will consume the oxygen as they replicate, and they need it to replicate. The easier time the yeast have creating a colony and fermenting, the less weird flavours you’ll get in the end product. The honey also needs to fully integrate with the water and tea so you can get an accurate gravity reading. If you think you’re done, shake it a little bit more. This is why you only put half of the water in, because this will take some time and effort to incorporate all the honey.
Step 5 – The Rest Of The Water – Mix Again
If the honey is completely mixed into the rest of the liquid, you can now put the rest of your water in the fermenter and shake again. You shouldn’t need to shake as long this time, just enough so it’s all the same colour.
Step 6 – Take a Specific Gravity Reading
The term gravity refers to the density of the liquid. The sugars that make up approximately 80% of honey are more dense than water, so we can measure the amount of sugar in a must by measuring the density of the liquid.
The gravity value of water is 1.000. 1.000 is the baseline. The gravity that we are aiming for is approximately 1.136. With that value, and an ending gravity reading, we can calculate the amount of alcohol by volume that was created.
The process for checking gravity is to carefully put your hydrometer into the measuring tube, and using the turkey baster to pull small amounts of the must into the baster and depositing it into the measuring tube until the hydrometer starts to float with maybe a centimeter of space between it and the bottom of the measuring tube. Once the hydrometer starts to float, we can take a measurement. The hydrometer will bob up and down and eventually settle. We want to read the measure at the liquid level on the side of the hydrometer.
Learning to read a hydrometer will take some practice, and I’ll try my best to explain it. Below is a blown up image of the measurements on a gauge inside the hydrometer. On the left side where it has annotations like “Beer”, you will see solid horizontal lines. The shorter lines each measure 0.002 specific gravity. The longer lines each measure 0.010 gravity. The number that is above the longer lines is the value of the line it sits on. As we are testing a liquid, the liquid starts at the bottom of the scale and eventually reaches a point up the scale from there, so we can use the liquid that is covering the scale to measure what the specific gravity is.
Reading from the top down, we can figure out each decimal point individually. If the red strip at the top is not covered by the liquid, you have a liquid with a gravity of at least 1.000, indicated by the large 1.000 in the red stripe. From there, if the red strip at the bottom is uncovered, the liquid will be at or around 1.100, also indicated by the large 1.100. Next we will look for the smaller numbers that are multiples of 10. If the number is uncovered, your gravity is at least that high, so figure out the highest 10s number that is uncovered and put that in the second decimal place. E.G. 1.120. For the last decimal place, count from the longer line the number of smaller lines under it down to the liquid level. Each of those lines is 0.002, so if 3 of those smaller lines are uncovered, that would be 0.006. Going on from our example, that would make it 1.126.
That’s the basics on how to read specific gravity on a hydrometer.

Step 7 – Pitch Yeast and Cinnamon
Now that the must is pretty much complete, you can pitch your yeast. I prefer to dry pitch, so using a completely separate dry funnel is recommended. Once you have pitched your yeast, give the fermenter a light swirl just to wet some of the yeast and get it to fall into suspension.
After that is done, drop in your cinnamon stick.
Step 8 – Prepare The Fermenter For The Long Sleep
Now the must is ready. Prepare your airlock by filling it to it’s fill line with the sanitizer fluid that you used to sanitise your equipment, or a neutral base spirit, like vodka. Put the prepared airlock in your bung and put your bung into the fermenter. They should form an airtight seal, with the only escape being through the airlock. If your bung is being pushed out, it might be too big for the fermenter and need a rubber band around the bung and handle to hold it down.
The next thing to do is put your fermenter into a cool dark place where the temperature doesn’t fluctuate too much.
Caring For The Fermentation
The fermentation should start up within around 24 hours of being left alone, and will take a few weeks to complete. You will know the fermentation has started because there will be a brownish cream layer on top of a lighter layer of foam. That cream layer is called a Krausen and is 100% normal.

I would recommend swirling the fermentation vessel once a day just to keep the spices, raisins and orange peel wet and to release some CO2. The environment inside the fermenter should be pretty much exclusively CO2, as it’s heavier than air and should push all the oxygen out the airlock. The CO2, in high enough concentrations will slow or stall your fermentation, so releasing a little CO2 each day wouldn’t hurt. The CO2 is also the perfect environment to stave off mould, so releasing a little CO2 each day will help maintain the blanket of CO2 on the surface of the must.
At around 3 weeks, I would recommend taking another specific gravity reading, just so we can keep track of the fermentation. By this stage it should be pretty much done. The activity (bubbling) in the airlock will have slowed, but may not have stopped. That’s fine, as we just want to check in.
SANITISE EVERYTHING THAT WILL TOUCH THE MEAD, because it is mead at this point. It should have alcohol in it. In all seriousness, try not to introduce oxygen when extracting a sample, as oxygen in the mead at this stage is bad, and make sure to sanitise everything that will touch the mead.
At 4 weeks, we will test the gravity to make sure the fermentation has stabilised, rack off the spices, as we don’t want spices to overpower the other flavours in the mead, and get the mead off the lees (lees is the term for the yeast cake at the bottom). Racking is the term for transferring a liquid from one vessel to another and is a gravity assisted process, so the destination vessel needs to be lower the source vessel. With the Auto Siphon, it will be a piece of cake. Just remember to not pick up any of the yeast cake at the bottom, for the clearest end result.
At around 6-8 weeks, I will mechanically degass the mead to draw out any CO2 that has not escaped in the previous 2-4 weeks of conditioning. This is an entirely optional step that doesn’t need to happen, but I prefer to degass before bottling.
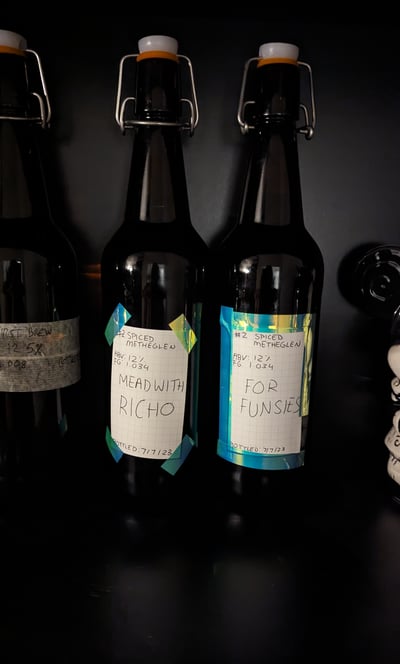
A few days after degassing (as long as it takes to clear sufficiently), we will bottle. As we have evacuated the CO2 from the brew, we don’t want to leave it too long so a week at most. If the brew is above 10% we don’t need to worry about the mead turning to vinegar, but mould is still a threat.
Bottle Aging
Bottle aging is the very hands off process of leaving the mead in the bottle for as long as you can keep you hands off of it to let the flavors mingle and settle. A young mead may have quite a strong ethanol taste, which is not desired, and will require time to settle down. Time heals all brews. I typically set aside 2 bottles from each brew for extended aging. One is set aside for 6 months, as a reward for my hard work, and one is set aside for 12 months, to be taken to a family event or a friends gathering. The 12 month bottle really should be the best possible result from the 4-6 bottles I produce from each batch, as long as it is stored properly.
Summary
I’ve really enjoyed making mead. I have found myself becoming more patient with each brew, as I learn to trust the process and let time do what it does. I have made mead that I am proud to have made, shared it with friends who have enjoyed it, and see myself making mead for the foreseeable future. I have big plans for some up coming brews and am excited to see where this takes me!
I hope you enjoyed this exploration into making mead, and maybe it has inspired you to try making your own mead. Let me know if you do and how it turns out!
Cheers
Bryce
Appendix:
How Our Brew Is Going
07/07/2023:
We put together the brew
Starting Gravity 1.134
29/07/2023:
Degassed with swirling every day up until now
Tested gravity at 3 week mark
Gravity: 1.060
Tastes great
Will leave untouched until 04/08/23 to settle so the lees can form
Things Left To Do
04/08/2023:
Rack and validate FG at 4 weeks to get mead off lees and spices
Bottle at 6-8 weeks after degassing and clearing
Late August:
Bottling:
Projected ABV: 11%
Projected Gravity: 1.054
Projected yield: 5 full bottles and 3/4 of a bottle
Leave a Reply
You must be logged in to post a comment.